

To use the below matrices LaTeX code you need to add the below package to your document
\usepackage{nicematrix}vertical space between the rows
Up to the present time, rows of the arrays created by default are too close to each other as can be seen from the below example
\frac{1}{2} & \frac{1}{2} \\
\frac{1}{3} & \frac{1}{4} \\
\end{pmatrix}$

To solve this problem the nicematrix provides two parameters
- cell –space-top-limit and
- cell – space –bottom -limit
there is another parameter called cell-space-limits to set both parameters at once
$\begin{pNiceMatrix}
\frac12 & \frac12 \\
\frac13 & \frac14 \\
\end{pNiceMatrix}$

vertical position of the arrays
The parameter baseline is used to adjust the vertical position of the matrix to demonstrate, you adjust the position of letter A from up and down
7 & p & 1 \\
1 & 1 & 1 \\
1 & p & 1
\end{pNiceMatrix}$
![A = \begin{pNiceMatrix}[baseline=2] 7 & p & 1 \\ 1 & 1 & 1 \\ 1 & p & 1 \end{pNiceMatrix}](https://aneescraftsmanship.com/wp-content/ql-cache/quicklatex.com-a515dd28bd3264c04b4e9740dac89eac_l3.png "Rendered by QuickLaTeX.com")
In the same fashion, the parameter baseline can be aligned with a matrix on a horizontal rule (draw by \hline)
A=\begin{pNiceArray}{cc|cc}[baseline=line-3]
\dfrac{1}{A} & \dfrac{1}{B} & 0 & 0 \\
\dfrac{1}{C} & \dfrac{1}{D} & 0 & 0 \\
\hline
0 & 0 & A & B \\
0 & 0 & D & D \\
\end{pNiceArray} $
![\NiceMatrixOptions{cell-space-limits=1pt} A=\begin{pNiceArray}{cc|cc}[baseline=line-3] \dfrac{1}{A} & \dfrac{1}{B} & 0 & 0 \\ \dfrac{1}{C} & \dfrac{1}{D} & 0 & 0 \\ \hline 0 & 0 & A & B \\ 0 & 0 & D & D \\ \end{pNiceArray}](https://aneescraftsmanship.com/wp-content/ql-cache/quicklatex.com-1f7aa635865b1104a05da47847fd50f3_l3.png "Rendered by QuickLaTeX.com")
The block command
At this time, you can use the command \Block to place an element straightway in the center of a rectangle of merged cells of the array
The first argument of the \Block command is the size of the block of an order [ i-j ] where i is the number of rows and j is the number of columns
The second argument of the \Block command is the content of the block
\Block{3-3}{A} & & & 0 \\
& & & \Vdots \\
& & & 0 \\
\hline
0 & \Cdots& 0 & 0
\end{bNiceArray}$
![\begin{bNiceArray}{cw{c}{1cm}c|c}[margin] & & & 0 \\ & & & \\ & \beta& & \\ & & & \Vdots \\ & & & 0 \\ \hline 0 & \Cdots& 0 & 0 \end{bNiceArray}](https://aneescraftsmanship.com/wp-content/ql-cache/quicklatex.com-33d886284873a40e67156741272422fa_l3.png "Rendered by QuickLaTeX.com")
Thereafter, you can raise the size of Beta which was placed in the content of the block command generally, it is not possible in math mode to use straightway \large
\Block{3-3}<\Large>{\beta} & & & 0 \\
& & & \Vdots \\
& & & 0 \\
\hline
0 & \Cdots& 0 & 0
\end{bNiceArray}$

Furthermore, the \Block command accepts its first optional arguments as square brackets[ ] such as
- [l] for left
- [c] for center
- [r] for right
To fix the horizontal position of the content of the block
\Block[l]{3-3}<\Large>{\beta} & & & 0 \\
& & & \Vdots \\
& & & 0 \\
\hline
0 & \Cdots& 0 & 0
\end{bNiceArray}$

At this time, you fill the block with color by using the optional argument [fill=red]
\Block[fill=red]{3-3}<\Large>{\beta} & & & 0 \\
& & & \Vdots \\
& & & 0 \\
\hline
0 & \Cdots& 0 & 0
\end{bNiceArray}$

\Block[draw=red]{3-3}<\Large>{\beta} & & & 0 \\
& & & \Vdots \\
& & & 0 \\
\hline
0 & \Cdots& 0 & 0
\end{bNiceArray}$

\Block[color=red]{3-3}<\Large>{\beta} & & & 0 \\
& & & \Vdots \\
& & & 0 \\
\hline
0 & \Cdots& 0 & 0
\end{bNiceArray}$

\Block[hlines]{3-3}<\Large>{\beta} & & & 0 \\
& & & \Vdots \\
& & & 0 \\
\hline
0 & \Cdots& 0 & 0
\end{bNiceArray}$

\Block[hvlines]{3-3}<\Large>{\beta} & & & 0 \\
& & & \Vdots \\
& & & 0 \\
\hline
0 & \Cdots& 0 & 0
\end{bNiceArray}$

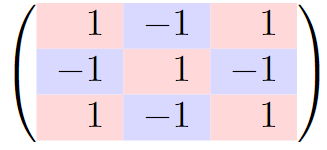
The code before command
You can align the columns with the letter l for the left side c for the center and r for the right side
\CodeBefore
\chessboardcolors{red!15}{blue!15}
\Body
1 & -1 & 1 \\
-1 & 1 & -1 \\
1 & -1 & 1
\end{pNiceMatrix}$
Horizontal lines and vertical lines in a matrix
The vlines argument in environment {pNiceMatrix} creates vertical lines in a matrix
1 & 2 & 3 & 4 & 5 & 6 \\
1 & 2 & 3 & 4 & 5 & 6 \\
1 & 2 & 3 & 4 & 5 & 6
\end{pNiceMatrix$
![\begin{pNiceMatrix}[vlines,rules/width=0.2pt] 1 & 2 & 3 & 4 & 5 & 6 \\ 1 & 2 & 3 & 4 & 5 & 6 \\ 1 & 2 & 3 & 4 & 5 & 6 \end{pNiceMatrix}](https://aneescraftsmanship.com/wp-content/ql-cache/quicklatex.com-6caf89c157d7fdd691a3ebf68af6a4c8_l3.png "Rendered by QuickLaTeX.com")
The hlines argument in environment {pNiceMatrix} creates horizontal lines in a matrix
1 & 2 & 3 & 4 & 5 & 6 \\
1 & 2 & 3 & 4 & 5 & 6 \\
1 & 2 & 3 & 4 & 5 & 6
\end{pNiceMatrix$
![\begin{pNiceMatrix}[hlines,rules/width=0.2pt] 1 & 2 & 3 & 4 & 5 & 6 \\ 1 & 2 & 3 & 4 & 5 & 6 \\ 1 & 2 & 3 & 4 & 5 & 6 \end{pNiceMatrix}](https://aneescraftsmanship.com/wp-content/ql-cache/quicklatex.com-ab10439c5f6b4165adff7885ec042555_l3.png "Rendered by QuickLaTeX.com")
The hvlines argument in environment {pNiceMatrix} creates both vertical and horizontal lines in a matrix
1 & 2 & 3 & 4 & 5 & 6 \\
1 & 2 & 3 & 4 & 5 & 6 \\
1 & 2 & 3 & 4 & 5 & 6
\end{pNiceMatrix$
![\begin{pNiceMatrix}[hvlines,rules/width=0.2pt] 1 & 2 & 3 & 4 & 5 & 6 \\ 1 & 2 & 3 & 4 & 5 & 6 \\ 1 & 2 & 3 & 4 & 5 & 6 \end{pNiceMatrix}](https://aneescraftsmanship.com/wp-content/ql-cache/quicklatex.com-13fc0e22c70b09cd95ccf2e3b1f8c3ce_l3.png "Rendered by QuickLaTeX.com")
Dotted Horizontal lines and vertical lines in a matrix
Command \hdottedline creates horizontal dotted lines in a matrix
1 & 2 & 3 & 4 & 5 \\
\hdottedline
6 & 7 & 8 & 9 & 10 \\
11 & 12 & 13 & 14 & 15
\end{pNiceMatrix}$

The specifier : creates vertical dotted lines in a matrix
1 & 2 & 3 & 4 & 5 \\
6 & 7 & 8 & 9 & 10 \\
11 & 12 & 13 & 14 & 15
\end{NiceArray}\right)$

Color the row and column of a matrix
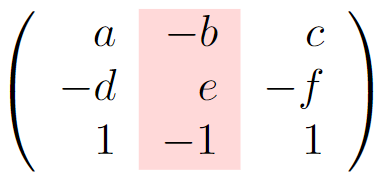
The command \columncolor can be used to color the individual column of a matrix
\CodeBefore
\columncolor{red!15}{2}
\Body
a & -b & c \\
-d & e & -f \\
1 & -1 & 1
\end{pNiceMatrix}$
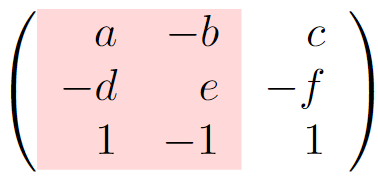
Coloring the two columns of a matrix
\CodeBefore
\columncolor{red!15}{1,2}
\Body
a & -b & c \\
-d & e & -f \\
1 & -1 & 1
\end{pNiceMatrix}$
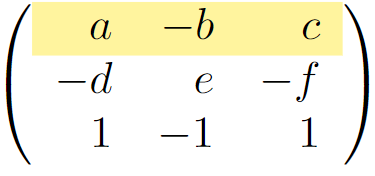
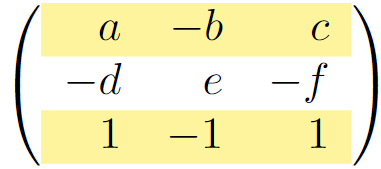
The command \rowcolor can be used to color the individual rows of a matrix
\CodeBefore
\rowcolor{yellow!50}{1}
\Body
a & -b & c \\
-d & e & -f \\
1 & -1 & 1
\end{pNiceMatrix}$
Coloring the two rows of a matrix
\CodeBefore
\rowcolor{yellow!50}{1,3}
\Body
a & -b & c \\
-d & e & -f \\
1 & -1 & 1
\end{pNiceMatrix}$
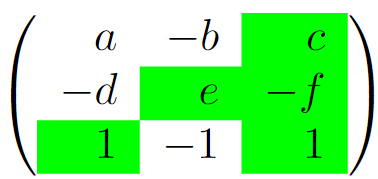
The command \cellcolor can be used to color the individual cells of a matrix
Above all, the command \cellcolor allows us to use all HTML colors
You can get all html color codes from here —->
\CodeBefore
\cellcolor[HTML]{00FF00}{3-1,2-2,-3}
\Body
a & -b & c \\
-d & e & -f \\
1 & -1 & 1
\end{pNiceMatrix}$
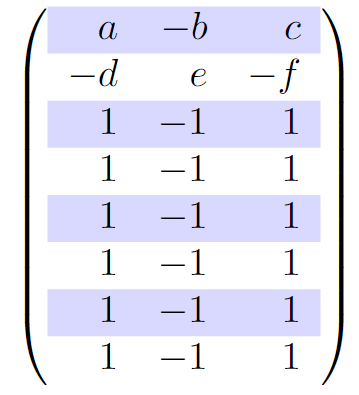
The command \rowlistcolors can be used to color all the individual cells of a matrix by giving a gap of 1empty color between them
\CodeBefore
\rowlistcolors{1}{blue!15, }
\Body
a & -b & c \\
-d & e & -f \\
1 & -1 & 1\\
1 & -1 & 1\\
1 & -1 & 1\\
1 & -1 & 1\\
1 & -1 & 1\\
1 & -1 & 1\\
\end{pNiceMatrix}$
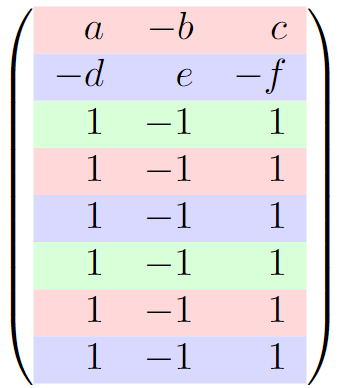
\CodeBefore
\rowlistcolors{1}{red!15,blue!15,green!15}
\Body
a & -b & c \\
-d & e & -f \\
1 & -1 & 1\\
1 & -1 & 1\\
1 & -1 & 1\\
1 & -1 & 1\\
1 & -1 & 1\\
1 & -1 & 1\\
\end{pNiceMatrix}$
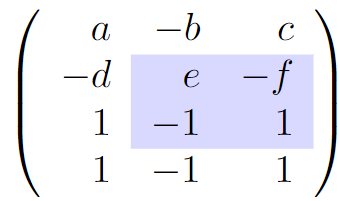
The command \rectanglecolor can be used to color specific blocks of a matrix in a rectangular shape with the first, argument as a color second as an upper-left cell of the rectangle, and the third argument as a lower-right cell of the rectangle.
\CodeBefore
\rectanglecolor{blue!15}{2-2}{3-3}
\Body
a & -b & c \\
-d & e & -f \\
1 & -1 & 1\\
1 & -1 & 1\\
\end{pNiceMatrix}$
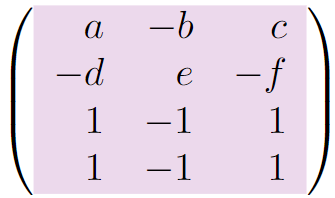
The command \arraycolor can be used to color all the array in one shot
\CodeBefore
\rowlistcolors{1}{red!15,blue!15,green!15}
\Body
a & -b & c \\
-d & e & -f \\
1 & -1 & 1\\
1 & -1 & 1\\
\end{pNiceMatrix}$
Fix the minimal width of all the columns
With the help of columns width, you can set the space between two columns
1 & 12 & 123 \\
12 & 0 & 0 \\
4 & 1 & 2
\end{pNiceMatrix}$
![\begin{pNiceMatrix}[columns-width = 1cm] 1 & 12 & 123 \\ 12 & 0 & 0 \\ 4 & 1 & 2 \end{pNiceMatrix}](https://aneescraftsmanship.com/wp-content/ql-cache/quicklatex.com-ebc4aff503cbad06860367b95879b691_l3.png "Rendered by QuickLaTeX.com")
At this point, by setting the columns-width value as auto then at that instant, all the columns of the array will have a width equal to the widest cell of the array
1 & 12 & 12 \\
12 & 0 & 0 \\
4 & 1 & 2
\end{pNiceMatrix}$
![\begin{pNiceMatrix}[columns-width = auto] 1 & 12 & 12 \\ 12 & 0 & 0 \\ 4 & 1 & 2 \end{pNiceMatrix}](https://aneescraftsmanship.com/wp-content/ql-cache/quicklatex.com-6a6c95d76417957c316e7f24fd508164_l3.png "Rendered by QuickLaTeX.com")
At the same time, it is possible to fix the minimal width of the columns of all the arrays of a current scope with the command \NiceMatrixOptions.
\begin{pNiceMatrix}
a & b \\ c & d
\end{pNiceMatrix}
=
\begin{pNiceMatrix}
1 & 124 \\ 345 & 2
\end{pNiceMatrix} $

The environment {NiceMatrixBlock} allows us to fix a zone were all the matrices will have their columns of the same width at the same time, equal to the widest cell of all the matrices
\begin{array}{c}
\begin{bNiceMatrix}
2 & 17 \\ -8 & -6
\end{bNiceMatrix} \\ \\
\begin{bNiceMatrix}
1 & 12453456789 \\ 345 & 2
\end{bNiceMatrix}
\end{array}
\end{NiceMatrixBlock} $

Exterior rows and columns of a matrix
& C_1 & \Cdots & & C_4 & \\
L_1 & a_{11} & a_{12} & a_{13} & a_{14} & L_1 \\
\Vdots & a_{21} & a_{22} & a_{23} & a_{24} & \Vdots \\
& a_{31} & a_{32} & a_{33} & a_{34} & \\
L_4 & a_{41} & a_{42} & a_{43} & a_{44} & L_4 \\
& C_1 & \Cdots & & C_4 &
\end{pNiceMatrix}$
![\begin{pNiceMatrix}[first-row,last-row,first-col,last-col,nullify-dots] & C_1 & \Cdots & & C_4 & \\ L_1 & a_{11} & a_{12} & a_{13} & a_{14} & L_1 \\ \Vdots & a_{21} & a_{22} & a_{23} & a_{24} & \Vdots \\ & a_{31} & a_{32} & a_{33} & a_{34} & \\ L_4 & a_{41} & a_{42} & a_{43} & a_{44} & L_4 \\ & C_1 & \Cdots & & C_4 & \end{pNiceMatrix}](https://aneescraftsmanship.com/wp-content/ql-cache/quicklatex.com-f2a80f2074a1173783b2e3e1cd70dbe3_l3.png "Rendered by QuickLaTeX.com")
code-for-first-col = \color{blue},
code-for-last-row = \color{green},
code-for-last-col = \color{magenta}}
\begin{pNiceArray}{cc|cc}[first-row,last-row=5,first-col,last-col,nullify-dots]
& C_1 & \Cdots & & C_4 & \\
L_1 & a_{11} & a_{12} & a_{13} & a_{14} & L_1 \\
\Vdots & a_{21} & a_{22} & a_{23} & a_{24} & \Vdots \\
\hline
& a_{31} & a_{32} & a_{33} & a_{34} & \\
L_4 & a_{41} & a_{42} & a_{43} & a_{44} & L_4 \\
& C_1 & \Cdots & & C_4 &
\end{pNiceArray} $
![\NiceMatrixOptions{code-for-first-row = \color{red}, code-for-first-col = \color{blue}, code-for-last-row = \color{green}, code-for-last-col = \color{magenta}} \begin{pNiceArray}{cc|cc}[first-row,last-row=5,first-col,last-col,nullify-dots] & C_1 & \Cdots & & C_4 & \\ L_1 & a_{11} & a_{12} & a_{13} & a_{14} & L_1 \\ \Vdots & a_{21} & a_{22} & a_{23} & a_{24} & \Vdots \\ \hline & a_{31} & a_{32} & a_{33} & a_{34} & \\ L_4 & a_{41} & a_{42} & a_{43} & a_{44} & L_4 \\ & C_1 & \Cdots & & C_4 & \end{pNiceArray}](https://aneescraftsmanship.com/wp-content/ql-cache/quicklatex.com-31dea7143f7184301282b0fd7f9f8cbe_l3.png "Rendered by QuickLaTeX.com")
a_1 & \Cdots & & & a_1 \\
\Vdots & a_2 & \Cdots & & a_2 \\
& \Vdots & \Ddots[color=red] \\
\\
a_1 & a_2 & & & a_n
\end{bNiceMatrix}$
![\begin{bNiceMatrix} a_1 & \Cdots & & & a_1 \\ \Vdots & a_2 & \Cdots & & a_2 \\ & \Vdots & \Ddots[color=red] \\ \\ a_1 & a_2 & & & a_n \end{bNiceMatrix}](https://aneescraftsmanship.com/wp-content/ql-cache/quicklatex.com-3c0a0a7590f8c6e5049fb7c56151f9c5_l3.png "Rendered by QuickLaTeX.com")
Leave a Reply