

#include <WiFi.h>
const char* ssid = "AndroidAP"; //SSID of your network
const char* password = "66301111"; //password of your network
//A client can directly connect to a server using TELNET, which logs into port 80
WiFiServer server(80);
// Variable to store the HTTP request
String header;
// Auxiliar variables to store the current output state
String output32State = "off";
String output33State = "off";
// Assign output variables to GPIO pins
const int output32 = 32;
const int output33 = 33;
// Current time
unsigned long currentTime = millis();
// Previous time
unsigned long previousTime = 0;
// Define timeout time in milliseconds (example: 2000ms = 2s)
const long timeoutTime = 2000;
void setup(){
Serial.begin(115200);
// Initialize the output variables as outputs
pinMode(output32, OUTPUT);
pinMode(output33, OUTPUT);
// Set outputs to LOW
digitalWrite(output32, LOW);
digitalWrite(output33, LOW);
// Connect to Wi-Fi network with SSID and password
Serial.print("Connecting to ");
Serial.println(ssid);
WiFi.begin(ssid, password);
while (WiFi.status() != WL_CONNECTED) {
delay(500);
Serial.print(".");
}
// Print local IP address and start web server
Serial.println("");
Serial.println("WiFi connected.");
Serial.println("IP address: ");
Serial.println(WiFi.localIP());
server.begin();
}
void loop(){
WiFiClient client = server.available(); // Listen for incoming clients
if (client) { // If a new client connects,
currentTime = millis();
previousTime = currentTime;
Serial.println("New Client."); // print a message out in the serial port
String currentLine = ""; // make a String to hold incoming data from the client
while (client.connected() && currentTime - previousTime <= timeoutTime) { // loop while the client's connected
currentTime = millis();
if (client.available()) { // if there's bytes to read from the client,
char c = client.read(); // read a byte, then
Serial.write(c); // print it out the serial monitor
header = header + c;
if (c == '\n') { // if the byte is a newline character
// if the current line is blank, you got two newline characters in a row.
// that's the end of the client HTTP request, so send a response:
if (currentLine.length() == 0) {
// HTTP headers always start with a response code (e.g. HTTP/1.1 200 OK)
// and a content-type so the client knows what's coming, then a blank line:
client.print("HTTP/1.1 200 OK"); //status code 200 and phrase OK means the request is successful
client.println("Content-type:text/html");
client.println("Connection: close");
client.println();
// turns the GPIOs on and off
//HTTP request methods (GET is the one method that requests a document from the server )
if (header.indexOf("GET /32/on") >= 0) {
Serial.println("GPIO 32 on");
output32State = "ON";
digitalWrite(output32, HIGH);
} else if (header.indexOf("GET /32/off") >= 0) {
Serial.println("GPIO 32 off");
output32State = "OFF";
digitalWrite(output32, LOW);
} else if (header.indexOf("GET /33/on") >= 0) {
Serial.println("GPIO 33 on");
output33State = "ON";
digitalWrite(output33, HIGH);
} else if (header.indexOf("GET /33/off") >= 0) {
Serial.println("GPIO 33 off");
output33State = "OFF";
digitalWrite(output33, LOW);
}
//HTML code start from here, to display webpage
client.print("<!DOCTYPE html><html>");
client.print("<head><meta name=\"viewport\" content=\"width=device-width, initial-scale=1\">");
client.print("<link rel=\"icon\" href=\"data:,\">");
// Internal Style.css sheat
client.print("<style>html { font-family: Helvetica; display: inline-block; margin: 0px auto; text-align: center;}");
client.print(".button { background-color: Lime; border-radius: 30px; border: none; color: white; padding: 16px 40px;");
client.print("text-decoration: none; font-size: 30px; margin: 2px; cursor: pointer;}");
client.print("body {background-color: Aqua;}");// change the background color of the web page from here
client.print(".Navy{color:Navy;}");
client.print("div.absolute {position: absolute;top: 500px; right: 0;width: 200px;height: 10px;}");
client.print(".button2 {background-color: #FF0000;}</style></head>");
// <body> start from here
client.print("<body>");
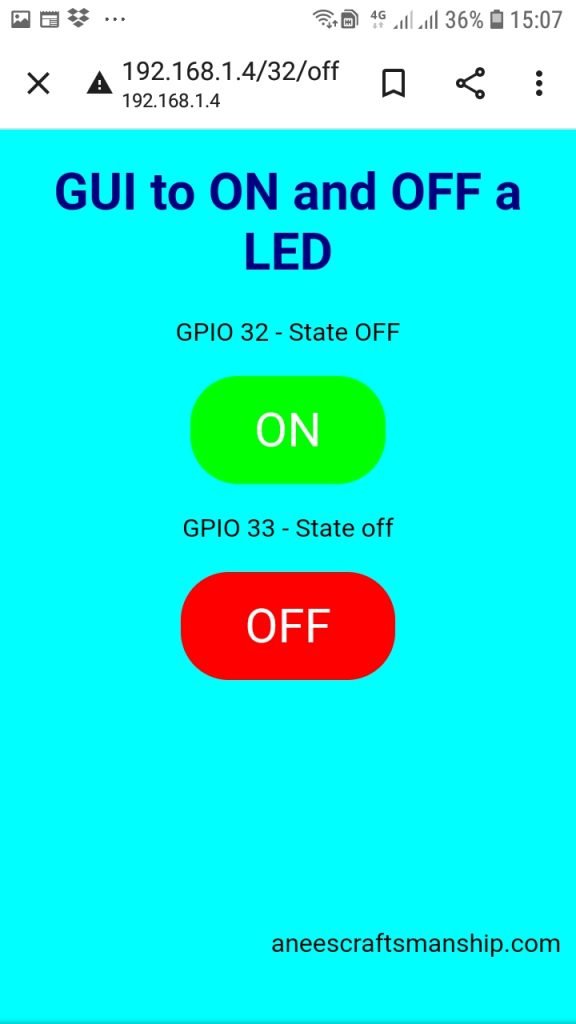
client.print("<h1 class=""Navy"">GUI to ON and OFF a LED </h1>");
client.print("<div class=""absolute"">aneescraftsmanship.com</div>");
// Display current state, and ON/OFF buttons for GPIO 32
client.print("<p>GPIO 32 - State " + output32State + "</p>");
// If the output26State is off, it displays the ON button
if (output32State=="OFF") {
client.print("<p><a href=\"/32/on\"><button class=\"button\">ON</button></a></p>");
} else {
client.print("<p><a href=\"/32/off\"><button class=\"button button2\">OFF</button></a></p>");
}
// Display current state, and ON/OFF buttons for GPIO 34
client.print("<p>GPIO 33 - State " + output33State + "</p>");
// If the output33State is off, it displays the ON button
if (output33State=="OFF") {
client.print("<p><a href=\"/33/on\"><button class=\"button\">ON</button></a></p>");
} else {
client.print("<p><a href=\"/33/off\"><button class=\"button button2\">OFF</button></a></p>");
}
client.print("</body></html>");
// The HTTP response ends with another blank line
client.println();
// Break out of the while loop
break;
} else { // if you got a newline, then clear currentLine
currentLine = "";
}
} else if (c != '\r') { // if you got anything else but a carriage return character,
currentLine = currentLine+c; // add it to the end of the currentLine
}
}
}
// Clear the header variable
header = "";
// Close the connection
client.stop();
Serial.println("Client disconnected.");
Serial.println("");
}
}To use the above code, you need the following materials
- Esp32 board
- 3 jumper wires of male to female
- Breadboard
- 2 LEDs
- 2 resistors of 330 ohms
- Arduino ide installed on your system
First, copy and paste the above code in an Arduino ide then select your esp32 board and port number
Second, take a breadboard and insert two LEDs into it
Third, take two resistors of 330 ohms and connect the ground of the breadboard to the negatives(-) of LEDS with resistors
Fourth, take 3 jumper wires of male to female 1, connect the ESP32 GND pin with the breadboard ground 2, connect the pin D32 and pin D33 OF ESP32 board to the positive(+) side of the LEDs
Fifth, when the code is fully uploaded on the board then at that instant, open the serial monitor to note down the IP address in case, if you see, a blank screen on your serial monitor then at that instant press the EN button from ESP32board
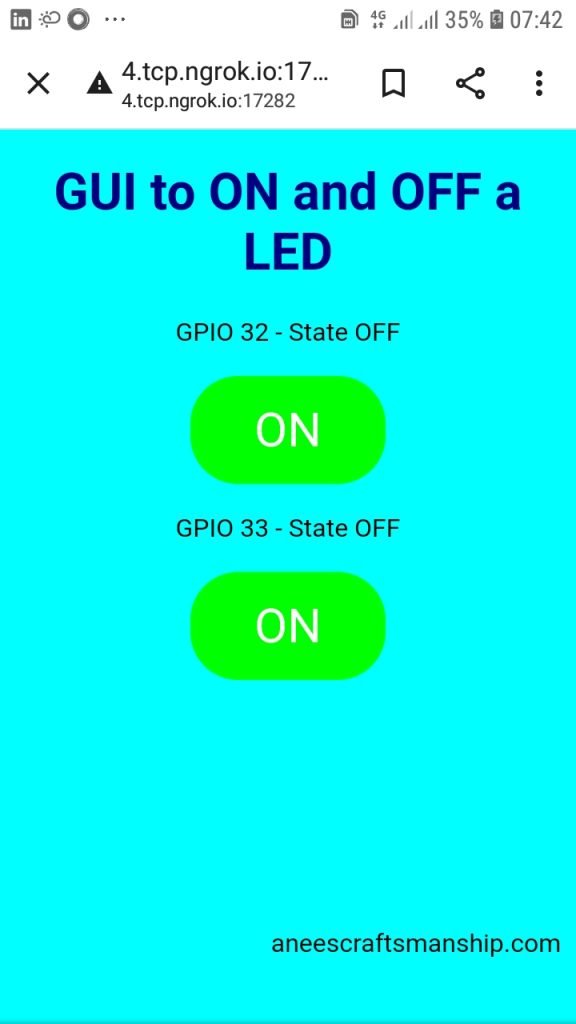
Sixth, write the IP address which you have got from the serial monitor into your web browser and click on the ON and OFF button to open and close the LEDs lights
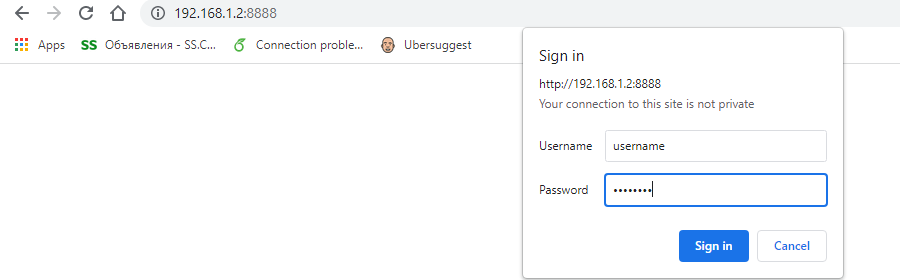
Secure the webserver with username and password
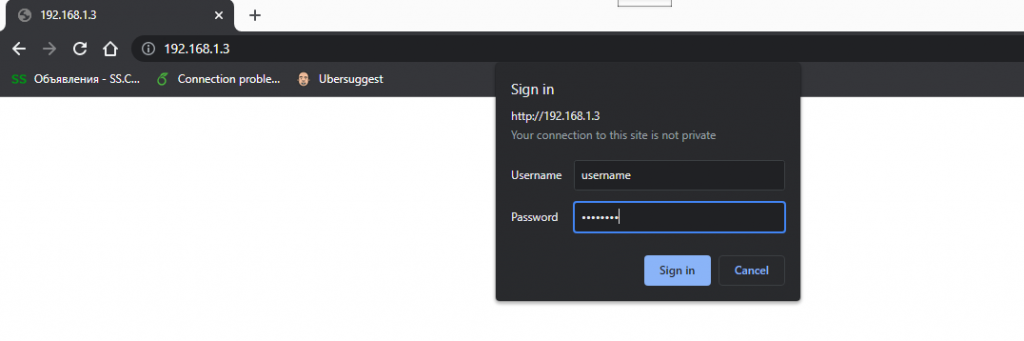
You can secure the webserver by using username and password and the username and password for the below code is username and password
To secure the webserver the client sends the username and password as unencrypted base64 encoded text
You can also generate a username and password of your own by using the base64 online tool
Click here for base64 tool —->
Make sure you added colon(:) in between your username and password such as below
username:password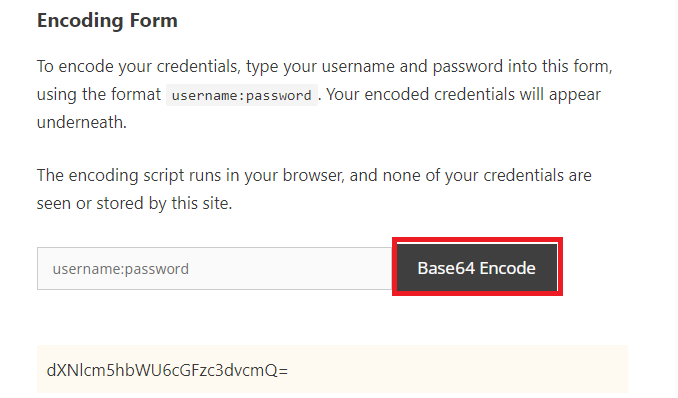
Status codes
Status codes used in the field of the replay messages by the server
| Code | Phrase | Description |
|---|---|---|
| Success | ||
| 200 | OK | the request is successful |
| Client Error | ||
| 401 | Unauthorized | the request lacks proper authorization |
HTTP authentication
The Basic authentication scheme is an HTTP schema that transmits its credentials such as user-id and password encoded by a Base64 tool
Note: the basic scheme is considered to be unsecured as it sends its credentials encoded but not encrypted the connection can be secured until it sends the credentials over a secure encrypted(HTTPS) connection
The WWW-Authenticate is a response header and the syntax for the WWW-Authenticate header is mentioned below
WWW-Authenticate:<type> realm = “quoted-string”Here, the type is the authentication scheme(Basic) and the authentication parameter is a realm although the realm-value is a quoted string
#include <WiFi.h>

const char* ssid = "AndroidAP"; //SSID of your network
const char* password = "66301111"; //password of your network

//A client can directly connect to a server using TELNET, which logs into port 80
WiFiServer server(80);

// Variable to store the HTTP request
String header;

// Auxiliar variables to store the current output state
String output32State = "off";
String output33State = "off";

// Assign output variables to GPIO pins
const int output32 = 32;
const int output33 = 33;


// Current time
unsigned long currentTime = millis();
// Previous time
unsigned long previousTime = 0;
// Define timeout time in milliseconds (example: 2000ms = 2s)
const long timeoutTime = 2000;
void setup(){
  Serial.begin(115200);
  // Initialize the output variables as outputs
  pinMode(output32, OUTPUT);
  pinMode(output33, OUTPUT);
  // Set outputs to LOW
  digitalWrite(output32, LOW);
  digitalWrite(output33, LOW);

  // Connect to Wi-Fi network with SSID and password
  Serial.print("Connecting to ");
  Serial.println(ssid);
  WiFi.begin(ssid, password);
  while (WiFi.status() != WL_CONNECTED) {
    delay(500);
    Serial.print(".");
  }
  // Print local IP address and start web server
  Serial.println("");
  Serial.println("WiFi connected.");
  Serial.println("IP address: ");
  Serial.println(WiFi.localIP());
  server.begin();
}

void loop(){
  WiFiClient client = server.available();   // Listen for incoming clients

  if (client) {                             // If a new client connects,
    currentTime = millis();
    previousTime = currentTime;
    Serial.println("New Client.");          // print a message out in the serial port
    String currentLine = "";                // make a String to hold incoming data from the client
    while (client.connected() && currentTime - previousTime <= timeoutTime) {  // loop while the client's connected
      currentTime = millis();
      if (client.available()) {             // if there's bytes to read from the client,
        char c = client.read();             // read a byte, then
        Serial.write(c);                    // print it out the serial monitor
        header = header + c;
        if (c == '\n') {                    // if the byte is a newline character
          // if the current line is blank, you got two newline characters in a row.
          // that's the end of the client HTTP request, so send a response:
          if (currentLine.length() == 0) {
            // checking if header is valid
            // dXNlcm5hbWU6cGFzc3dvcmQ= =  base64 encode string
            // Finding the right credential string, then loads web page
            if(header.indexOf("dXNlcm5hbWU6cGFzc3dvcmQ=") >= 0) {
              // HTTP headers always start with a response code (e.g. HTTP/1.1 200 OK)
              // and a content-type so the client knows what's coming, then a blank line:
            // HTTP headers always start with a response code (e.g. HTTP/1.1 200 OK)
            // and a content-type so the client knows what's coming, then a blank line:
            client.print("HTTP/1.1 200 OK"); //status code 200 and phrase OK means the request is successful
            client.println("Content-type:text/html");
            client.println("Connection: close");
            client.println();

            // turns the GPIOs on and off
            //HTTP request methods (GET is the one method that requests a document from the server )
            if (header.indexOf("GET /32/on") >= 0) {
              Serial.println("GPIO 32 on");
              output32State = "ON";
              digitalWrite(output32, HIGH);
            } else if (header.indexOf("GET /32/off") >= 0) {
              Serial.println("GPIO 32 off");
              output32State = "OFF";
              digitalWrite(output32, LOW);
            } else if (header.indexOf("GET /33/on") >= 0) {
              Serial.println("GPIO 33 on");
              output33State = "ON";
              digitalWrite(output33, HIGH);
            } else if (header.indexOf("GET /33/off") >= 0) {
              Serial.println("GPIO 33 off");
              output33State = "OFF";
              digitalWrite(output33, LOW);
            }

            //HTML code start from here, to display webpage
            client.print("<!DOCTYPE html><html>");
            client.print("<head><meta name=\"viewport\" content=\"width=device-width, initial-scale=1\">");
            client.print("<link rel=\"icon\" href=\"data:,\">");
            // Internal Style.css sheat
            client.print("<style>html { font-family: Helvetica; display: inline-block; margin: 0px auto; text-align: center;}");
            client.print(".button { background-color: Lime; border-radius: 30px; border: none; color: white; padding: 16px 40px;");
            client.print("text-decoration: none; font-size: 30px; margin: 2px; cursor: pointer;}");
            client.print("body {background-color: Aqua;}");// change the background color of the web page from here
            client.print(".Navy{color:Navy;}");
            client.print("div.absolute {position: absolute;top: 500px; right: 0;width: 200px;height: 10px;}");
            client.print(".button2 {background-color: #FF0000;}</style></head>");
            // <body> start from here
            client.print("<body>");
             client.print("<h1 class=""Navy"">GUI to ON and OFF a LED </h1>");
             client.print("<div class=""absolute"">aneescraftsmanship.com</div>");
            // Display current state, and ON/OFF buttons for GPIO 32
            client.print("<p>GPIO 32 - State " + output32State + "</p>");
            // If the output26State is off, it displays the ON button
            if (output32State=="OFF") {
              client.print("<p><a href=\"/32/on\"><button class=\"button\">ON</button></a></p>");
            } else {
              client.print("<p><a href=\"/32/off\"><button class=\"button button2\">OFF</button></a></p>");
            }

            // Display current state, and ON/OFF buttons for GPIO 34
            client.print("<p>GPIO 33 - State " + output33State + "</p>");
            // If the output33State is off, it displays the ON button
            if (output33State=="OFF") {
              client.print("<p><a href=\"/33/on\"><button class=\"button\">ON</button></a></p>");
            } else {
              client.print("<p><a href=\"/33/off\"><button class=\"button button2\">OFF</button></a></p>");
            }
            client.print("</body></html>");

            // The HTTP response ends with another blank line
            client.println();
            // Break out of the while loop
            break;
            }
               // the request lacks proper authorization
            else {
              client.println("HTTP/1.1 401 Unauthorized");
              client.println("WWW-Authenticate: Basic realm=\"String-anees\"");
              client.println("Content-Type: text/html");
              client.println();
              client.println("<html>Authentication failed</html>");
            }
          } else { // if you got a newline, then clear currentLine
            currentLine = "";
          }
        } else if (c != '\r') {  // if you got anything else but a carriage return character,
          currentLine = currentLine+c;      // add it to the end of the currentLine
        }
      }
    }
    // Clear the header variable
    header = "";
    // Close the connection
    client.stop();
    Serial.println("Client disconnected.");
    Serial.println("");
  }
}
Use ESP32 web server from anywhere with the help of ngrok
Ngrok is a tool that exposes a local webserver running on your local machine to the internet
till now! We can ON and OFF a led by using a local wifi connection in case if you use Ngrok we can ON and OFF a led anywhere from the world
the major benefit of using the Ngrok tool is that it exposes the local ESP32 webserver running on your machine to the internet so that you can control and monitor your home from anywhere in the world
isn’t that great!
Let’s see how we can use Ngrok
Click here to visit the Ngrok website —->
First, you need to signup for Ngrok

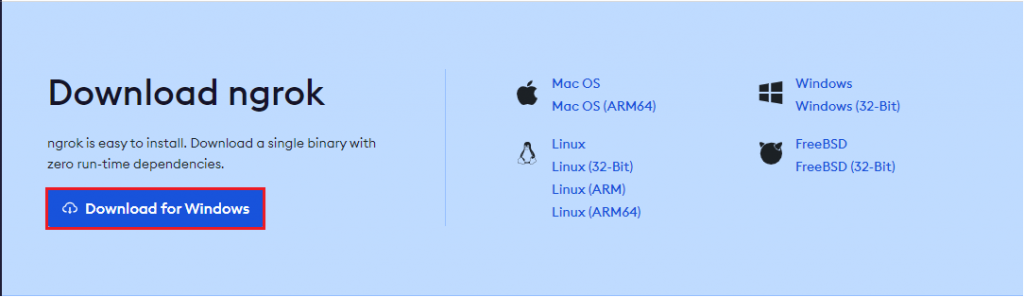
Second, download the Ngrok tool according to your operating system
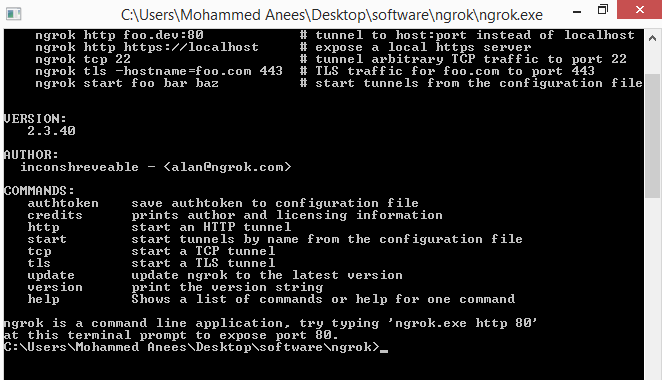
After you finish downloading the Ngrok tool then at that instant, you need to unzip the downloaded folder and run the application
When you run the Ngrok application you will see something like the below screen
Third, add your account authtoken
Your account authtoken will look something like this
24ngZWHq0YjipD9FFlZMJss4q3G_53j6jCzLq8mKDHgsAAAVD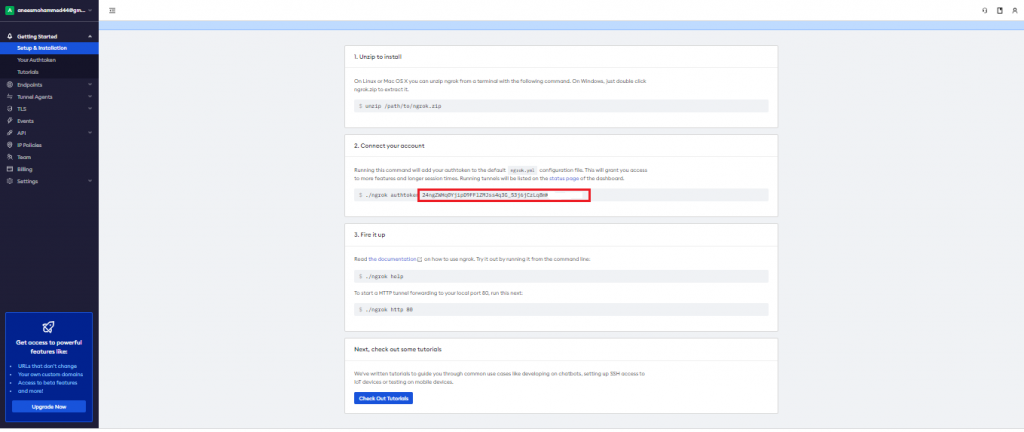
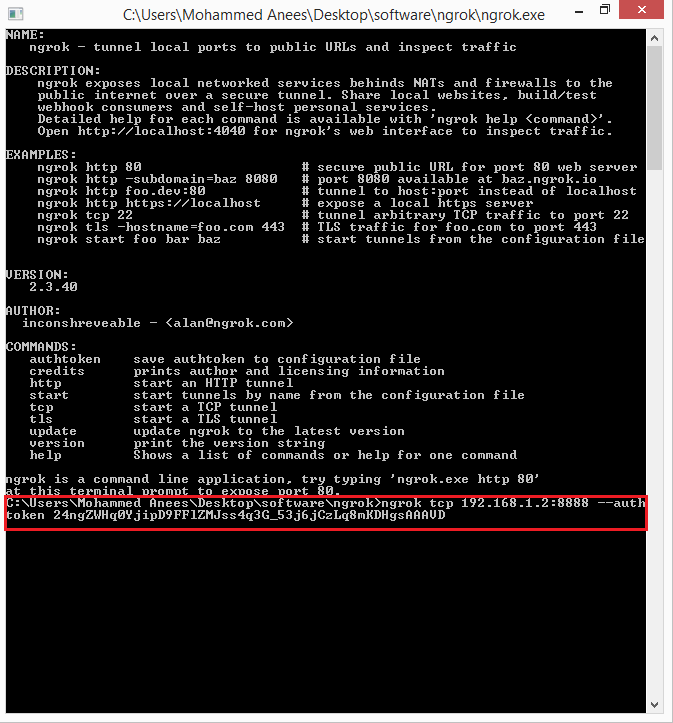
Type the below command in your ngrok application terminal
ngrok tcp 192.168.1.2:8888 --authtoken 24ngZWHq0YjipD9FFlZMJss4q3G_53j6jCzLq8mKDHgsAAAVDHere in the above command, you need to replace the IP address 192.168.1.2 with your own ESP IP address and also you need to replace the Authtoken (24ngZWHq0YjipD9FFlZMJss4q3G_53j6jCzLq8mKDHgsAAAVD) with your ngrok account Authtoken
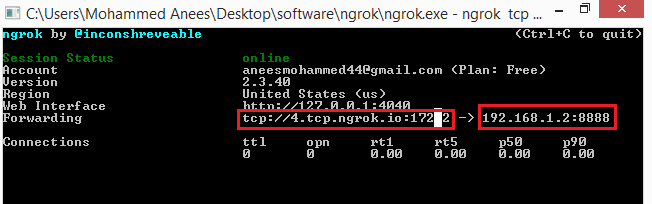
If the above command is executed successfully then you will see the below screen that shows your Tunnel is online and also your unique URL
Access ESP32 board web server from anywhere
First, upload the below code in your Arduino ide with ESP32 Board
Use the below address to access the Esp32 web server from a different network than your local network
http://4.tcp.ngrok.io:17282To access the ESP32 web server from a local network that is connected to your router
192.168.1.2:8888Second, type the username as username and password as a password to view the ESP32 web server
#include <WiFi.h>

const char* ssid = "AndroidAP"; //SSID of your network
const char* password = "66301111"; //password of your network

//A client connect to a server , which logs into port 8888
WiFiServer server(8888);

// Variable to store the HTTP request
String header;

// Auxiliar variables to store the current output state
String output32State = "off";
String output33State = "off";

// Assign output variables to GPIO pins
const int output32 = 32;
const int output33 = 33;


// Current time
unsigned long currentTime = millis();
// Previous time
unsigned long previousTime = 0;
// Define timeout time in milliseconds (example: 2000ms = 2s)
const long timeoutTime = 2000;
void setup(){
  Serial.begin(115200);
  // Initialize the output variables as outputs
  pinMode(output32, OUTPUT);
  pinMode(output33, OUTPUT);
  // Set outputs to LOW
  digitalWrite(output32, LOW);
  digitalWrite(output33, LOW);

  // Connect to Wi-Fi network with SSID and password
  Serial.print("Connecting to ");
  Serial.println(ssid);
  WiFi.begin(ssid, password);
  while (WiFi.status() != WL_CONNECTED) {
    delay(500);
    Serial.print(".");
  }
  // Print local IP address and start web server
  Serial.println("");
  Serial.println("WiFi connected.");
  Serial.println("IP address: ");
  Serial.println(WiFi.localIP());
  server.begin();
}

void loop(){
  WiFiClient client = server.available();   // Listen for incoming clients

  if (client) {                             // If a new client connects,
    currentTime = millis();
    previousTime = currentTime;
    Serial.println("New Client.");          // print a message out in the serial port
    String currentLine = "";                // make a String to hold incoming data from the client
    while (client.connected() && currentTime - previousTime <= timeoutTime) {  // loop while the client's connected
      currentTime = millis();
      if (client.available()) {             // if there's bytes to read from the client,
        char c = client.read();             // read a byte, then
        Serial.write(c);                    // print it out the serial monitor
        header = header + c;
        if (c == '\n') {                    // if the byte is a newline character
          // if the current line is blank, you got two newline characters in a row.
          // that's the end of the client HTTP request, so send a response:
          if (currentLine.length() == 0) {
            // checking if header is valid
            // dXNlcm5hbWU6cGFzc3dvcmQ= =  base64 encode string
            // Finding the right credential string, then loads web page
            if(header.indexOf("dXNlcm5hbWU6cGFzc3dvcmQ=") >= 0) {
              // HTTP headers always start with a response code (e.g. HTTP/1.1 200 OK)
              // and a content-type so the client knows what's coming, then a blank line:
            // HTTP headers always start with a response code (e.g. HTTP/1.1 200 OK)
            // and a content-type so the client knows what's coming, then a blank line:
            client.print("HTTP/1.1 200 OK"); //status code 200 and phrase OK means the request is successful
            client.println("Content-type:text/html");
            client.println("Connection: close");
            client.println();

            // turns the GPIOs on and off
            //HTTP request methods (GET is the one method that requests a document from the server )
            if (header.indexOf("GET /32/on") >= 0) {
              Serial.println("GPIO 32 on");
              output32State = "ON";
              digitalWrite(output32, HIGH);
            } else if (header.indexOf("GET /32/off") >= 0) {
              Serial.println("GPIO 32 off");
              output32State = "OFF";
              digitalWrite(output32, LOW);
            } else if (header.indexOf("GET /33/on") >= 0) {
              Serial.println("GPIO 33 on");
              output33State = "ON";
              digitalWrite(output33, HIGH);
            } else if (header.indexOf("GET /33/off") >= 0) {
              Serial.println("GPIO 33 off");
              output33State = "OFF";
              digitalWrite(output33, LOW);
            }

            //HTML code start from here, to display webpage
            client.print("<!DOCTYPE html><html>");
            client.print("<head><meta name=\"viewport\" content=\"width=device-width, initial-scale=1\">");
            client.print("<link rel=\"icon\" href=\"data:,\">");
            // Internal Style.css sheat
            client.print("<style>html { font-family: Helvetica; display: inline-block; margin: 0px auto; text-align: center;}");
            client.print(".button { background-color: Lime; border-radius: 30px; border: none; color: white; padding: 16px 40px;");
            client.print("text-decoration: none; font-size: 30px; margin: 2px; cursor: pointer;}");
            client.print("body {background-color: Aqua;}");// change the background color of the web page from here
            client.print(".Navy{color:Navy;}");
            client.print("div.absolute {position: absolute;top: 500px; right: 0;width: 200px;height: 10px;}");
            client.print(".button2 {background-color: #FF0000;}</style></head>");
            // <body> start from here
            client.print("<body>");
             client.print("<h1 class=""Navy"">GUI to ON and OFF a LED </h1>");
             client.print("<div class=""absolute"">aneescraftsmanship.com</div>");
            // Display current state, and ON/OFF buttons for GPIO 32
            client.print("<p>GPIO 32 - State " + output32State + "</p>");
            // If the output26State is off, it displays the ON button
            if (output32State=="OFF") {
              client.print("<p><a href=\"/32/on\"><button class=\"button\">ON</button></a></p>");
            } else {
              client.print("<p><a href=\"/32/off\"><button class=\"button button2\">OFF</button></a></p>");
            }

            // Display current state, and ON/OFF buttons for GPIO 34
            client.print("<p>GPIO 33 - State " + output33State + "</p>");
            // If the output33State is off, it displays the ON button
            if (output33State=="OFF") {
              client.print("<p><a href=\"/33/on\"><button class=\"button\">ON</button></a></p>");
            } else {
              client.print("<p><a href=\"/33/off\"><button class=\"button button2\">OFF</button></a></p>");
            }
            client.print("</body></html>");

            // The HTTP response ends with another blank line
            client.println();
            // Break out of the while loop
            break;
            }
               // the request lacks proper authorization
            else {
              client.println("HTTP/1.1 401 Unauthorized");
              client.println("WWW-Authenticate: Basic realm=\"String-anees\"");
              client.println("Content-Type: text/html");
              client.println();
              client.println("<html>Authentication failed</html>");
            }
          } else { // if you got a newline, then clear currentLine
            currentLine = "";
          }
        } else if (c != '\r') {  // if you got anything else but a carriage return character,
          currentLine = currentLine+c;      // add it to the end of the currentLine
        }
      }
    }
    // Clear the header variable
    header = "";
    // Close the connection
    client.stop();
    Serial.println("Client disconnected.");
    Serial.println("");
  }
}
Leave a Reply