

in a word, To see the output of the below scripts use a serial monitor and in case, if you don’t see any output on the serial monitor then press the EN button from the esp32 board
WiFi.scanNetworks()
Description
in short, get the no of wifi network available
Parameters
none
syntax
WiFi.scanNetworks();
Returns
on the whole, Returns the no of wifi networks available nearby
Example
#include <WiFi.h>
void setup()
{
  // initialize serial:
  Serial.begin(115200);
  // scan for existing networks:
  Serial.println("Scanning available networks...");
{
   // scan for nearby networks:
  byte variable = WiFi.scanNetworks();

  Serial.print("no of wifi networks discovered:");
  Serial.println(variable);

}
}

void loop () {}
WiFi.SSID()
Description
in brief, gets the SSID or name of the available network
Parameters
wifiAccesspoint : name the network from which you would like to get the data
syntax
WiFi.SSID();
WiFi.SSID(wifiAccessPoint);
Returns
in time, name of the network
Example
#include <WiFi.h>

void setup()
{
  // initialize serial:
  Serial.begin(115200);
  // scan for existing networks:
  Serial.println("Scanning available networks...");
   // scan for nearby networks:
  byte variable = WiFi.scanNetworks();
  // print the list of networks seen:
  Serial.print("SSID List:");
  Serial.println(variable);
  //Iterate the no of networks you found and print the names for each network found:
  for (int i = 0; i<variable; i++) {
    Serial.print(i);
    Serial.print(") Network: ");
    Serial.println(WiFi.SSID(i));

}
}

void loop () {}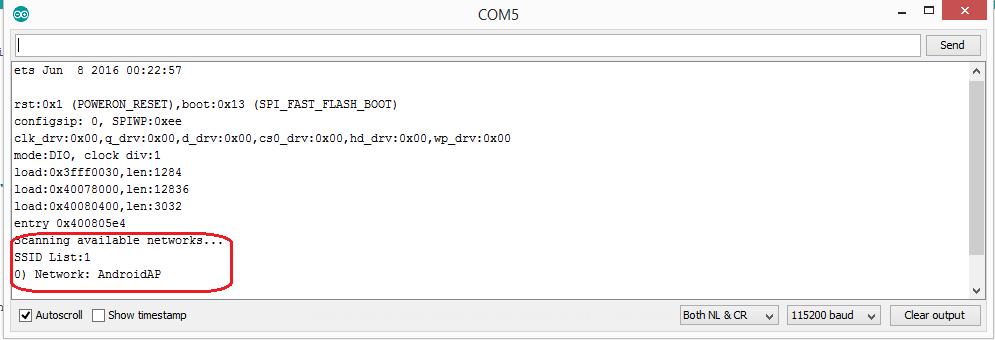
WiFi.RSSI()
Description
in short, RSSI means received signal strength indicator which is used to determine the radio signal strength of your device to hear from an access point or router
With the help of RSSI value, you can also determine, whether your device has enough signal strength to get a good wireless connection
At a larger distance from an access point or router the signal gets weaker and due to that data rate will be slower finally, which leads to a lower overall data throughput

syntax
WiFi.RSSI();
WiFi.RSSI(wifiAccessPoint);
Parameters
wifiAccessPoint specifies the network that you like get data
returns
RSSI in dBm
Example
#include <WiFi.h>
const char* ssid = "network"; //SSID of your network
const char* password = "%ssid777888e&";     //password of your network
void setup()
{
 // initialize serial:
 Serial.begin(115200);
 // Connect to Wi-Fi network with SSID and password
  Serial.print("Connecting to ");
  Serial.println(ssid);
  WiFi.begin(ssid, password);
  while (WiFi.status() != WL_CONNECTED) {
    delay(500);
    Serial.print(".");
 }
 {
  // Print the radio signal strength
  Serial.println("");
   long rssi = WiFi.RSSI();
  Serial.print("RSSI:");
  Serial.println(rssi);
 }
}
void loop () {}
WiFi.macAddress( )
Description
in due time, gets the MAC address of your wifi board
syntax
WiFi.macAddress(mac);
Parameters
in sum, Mac is a 6-byte array that holds the MAC address
Returns
at this time, Mac address of your wifi board
Example
#include <WiFi.h>
const char* ssid = "network"; //SSID of your network
const char* password = "%ssid7777&";     //password of your network
byte mac[6]; // a 6 byte array to hold the mac address
void setup()
{
 // initialize serial:
 Serial.begin(115200);
 // Connect to Wi-Fi network with SSID and password
  Serial.print("Connecting to ");
  Serial.println(ssid);
  WiFi.begin(ssid, password);
  while (WiFi.status() != WL_CONNECTED) {
    delay(500);

 }
// if you are connected, print your MAC address:
   {
  WiFi.macAddress(mac);
  Serial.println("MAC  address ");
  Serial.print(mac[5],HEX);
  Serial.print(":");
  Serial.print(mac[4],HEX);
  Serial.print(":");
  Serial.print(mac[3],HEX);
  Serial.print(":");
  Serial.print(mac[2],HEX);
  Serial.print(":");
  Serial.print(mac[1],HEX);
  Serial.print(":");
  Serial.println(mac[0],HEX);
  }
}
void loop () {}
WiFi.localIP()
Description
undeniably, gets the WiFi network IP address
Syntax
WiFi.localIP();
Parameters
Null
Returns
particularly, The IP address of the wifi network
Example
#include <WiFi.h>
const char* ssid = "network"; //SSID of your network
const char* password = "%ssid777888e&";     //password of your network
void setup()
{
 // initialize serial:
 Serial.begin(115200);
 // Connect to Wi-Fi network with SSID and password
  Serial.print("Connecting to ");
  Serial.println(ssid);
  WiFi.begin(ssid, password);
  while (WiFi.status() != WL_CONNECTED) {
    delay(500);
    Serial.print(".");
 }
  // Print local IP address of your network
  Serial.println("");
 Serial.println("WiFi connected.");
  Serial.println("IP address: ");
  Serial.println(WiFi.localIP());
}
void loop () {}
WiFi.subnetMask()
Description
basically, gets the WiFi network subnet mask value
Syntax
WiFi.subnetMask();
Parameters
Null
Returns
The overall subnet mask value of the wifi network
Example
#include <WiFi.h>
const char* ssid = "network"; //SSID of your network
const char* password ="%ssid777888e&";     //password of your network
void setup()
{
 // initialize serial:
 Serial.begin(115200);
 // Connect to Wi-Fi network with SSID and password
  Serial.print("Connecting to ");
  Serial.println(ssid);
  WiFi.begin(ssid, password);
  while (WiFi.status() != WL_CONNECTED) {
    delay(500);
    Serial.print(".");
 }
  // Print local subnetMask of your network
  Serial.println("");
 Serial.println("WiFi connected.");
  Serial.println("subnetMask ");
  Serial.println(WiFi.subnetMask());
}
void loop () {}
WiFi.gatewayIP()
Description
similarly, gets the WiFi gateway IP address
Syntax
WiFi.gatewayIP();
Parameters
Null
Returns
comparatively, The gateway IP address of the wifi network
Example
#include <WiFi.h>
const char* ssid = "network"; //SSID of your network
const char* password = "%ssid777888e&";     //password of your network
void setup()
{
 // initialize serial:
 Serial.begin(115200);
 // Connect to Wi-Fi network with SSID and password
  Serial.print("Connecting to ");
  Serial.println(ssid);
  WiFi.begin(ssid, password);
  while (WiFi.status() != WL_CONNECTED) {
    delay(500);
    Serial.print(".");
 }
  // Print local gateway IP  of your network
  Serial.println("");
 Serial.println("WiFi connected.");
  Serial.println("gateway IP ");
  Serial.println(WiFi.gatewayIP());
}
void loop () {}
Esp32 Client server-based communication
in the first place, let us first define what is a server?
A server is a machine that stores the data and when it receives a requrest from the client then it will process that request and optionally it will return the result
but, What is a client?
A client can be a device that initiates the request such as a web browser
in essence, the server machine can never initiate a request always it is only the client machine that initiates a request

this time, Do you know?
on the whole, How does the client-server model work?
Or in other words how does the internet works
Let suppose, you have entered a website address(http://aneescraftsmanship.com) then at that instance, the address will be called an URL(uniform resource locator) and which helps you to locate a resource on an internet
A Resource can be a webpage, images, video files, audio files, etc so, the communication b/w the client and server will be done with help of a protocol called HTTP(Hypertext transfer protocol)
When an HTTP becomes an HTTPS(HTTP + encryption) then, at that instance, the messages between client and server will also be encrypted
TCP/IP Stack
If you might know TCP/IP stack then you might also know that the data link layer of the TCP/IP stack is responsible for the delivery of frames over a link from one to another node and we called that process a node to node delivery
On the other hand, the network layer is responsible for the delivery of datagrams from one host to another host and we called that process as host to host delivery
Communication on the internet
Communication on the internet won’t happen by using host to node or host to host relationship but happen between two processes( application programs) and we called that process a process to process delivery
Similarly, the transport layer is responsible for the delivery of a packet from one process to another and the communication between processes can happen with the help of client/server relationship
TCP/IP Addressing
in reality, as you might know, to communicate a message from source to destination we need an address
for this purpose, at the data link layer, a MAC address will be used to deliver a frame to the destination node
on the contrary, at the network layer, an IP address will be used to deliver a datagram to the destination host
Similarly, at the transport layer, a port number will be used to deliver a packet to the destination process(application program)
server.available()
Description
Gets a client that is connected a server and you can close the connection by using client.stop()
syntax
server.available();
parameters
none
Returns
in sum, a client object
#include <WiFi.h>
const char* ssid = "xx"; //SSID of your network
const char* password = "%ssid6630&"; //password of your network
//port number 80 to logins into a server
WiFiServer server(80);
void setup(){
// initialize serial:
Serial.begin(115200);
// Connect to Wi-Fi network with SSID and password
Serial.print("Connecting to ");
Serial.println(ssid);
WiFi.begin(ssid, password);
while (WiFi.status() != WL_CONNECTED) {
delay(500);
Serial.print(".");
}
// Print local IP address of your network
Serial.println("");
server.begin();
Serial.println("WiFi connected.");
Serial.println("IP address: ");
Serial.println(WiFi.localIP());
}
void loop() {
// listen for incoming clients
WiFiClient client = server.available();
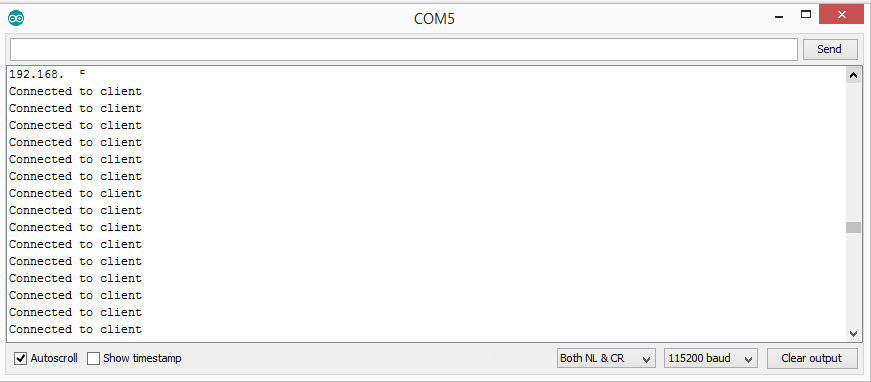
if (client) {
if (client.connected()) {
Serial.println("Connected to client");
}
// close the connection:
client.stop();
}
}in the first place, to use the above code, copy and paste the code in your Arduino ide and connect the esp32 board and select the board and port
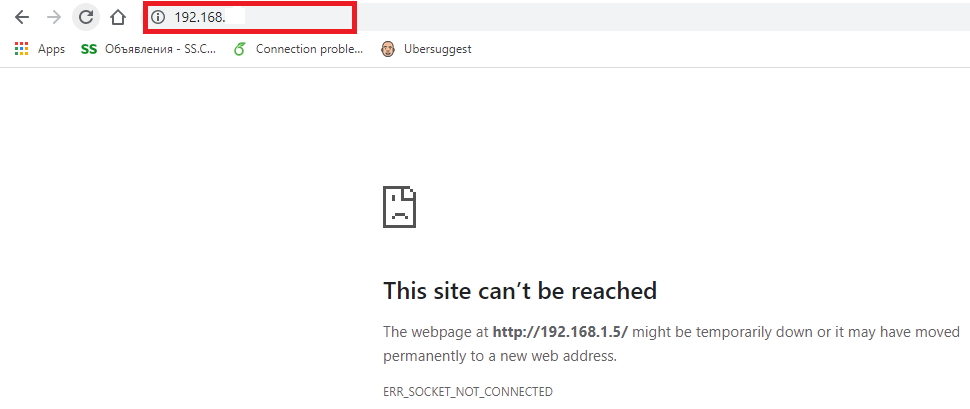
compile the script, after it finishes uploading the code then at that instant, open the serial monitor to note down the local IP address finally, paste the IP address in the web browser to see whether a client is connected to a server
client.print()
Description
print data on the server site through which the client is connected also by using a client.print you can write HTML and CSS on the server site
#include <WiFi.h>
// Replace with your network credentials
const char* ssid = "xx";
const char* password = "%ssid6630&";
// Set web server port number to 80
WiFiServer server(80);
// Variable to store the HTTP request
String header;
// Current time
unsigned long currentTime = millis();
// Previous time
unsigned long previousTime = 0;
// Define timeout time in milliseconds (example: 2000ms = 2s)
const long timeoutTime = 2000;
void setup() {
Serial.begin(115200);
// Connect to Wi-Fi network with SSID and password
Serial.print("Connecting to ");
Serial.println(ssid);
WiFi.begin(ssid, password);
while (WiFi.status() != WL_CONNECTED) {
delay(500);
Serial.print(".");
}
// Print local IP address and start web server
Serial.println("");
Serial.println("WiFi connected.");
Serial.println("IP address: ");
Serial.println(WiFi.localIP());
server.begin();
}
void loop(){
WiFiClient client = server.available(); // Listen for incoming clients
if (client) { // If a new client connects,
currentTime = millis();
previousTime = currentTime;
Serial.println("New Client."); // print a message out in the serial port
String currentLine = ""; // make a String to hold incoming data from the client
while (client.connected()&& currentTime - previousTime <= timeoutTime) { // loop while the client's connected
// currentTime = millis();
if (client.available()) { // if there's bytes to read from the client,
char c = client.read(); // read a byte, then
Serial.write(c); // print it out the serial monitor
header = header + c;
if (c == '\n') { // if the byte is a newline character
// if the current line is blank, you got two newline characters in a row.
// that's the end of the client HTTP request, so send a response:
if (currentLine.length() == 0) {
// HTTP headers always start with a response code (e.g. HTTP/1.1 200 OK)
// and a content-type so the client knows what's coming, then a blank line:
client.print("HTTP/1.1 200 OK");
client.println("Content-type:text/html");
client.println("Connection: close");
client.println();
//HTML code start from here, to display webpage
client.print("<!DOCTYPE html><html>");
client.print("<head><meta name=\"viewport\" content=\"width=device-width, initial-scale=1\">");
//client.println("<link rel=\"icon\" href=\"data:,\">");
client.print("<style> body {background-color: yellow;}");
client.print("h1 {color: red; margin-left: 20px;} ");
client.print("</style></head>");
// Web Page Heading
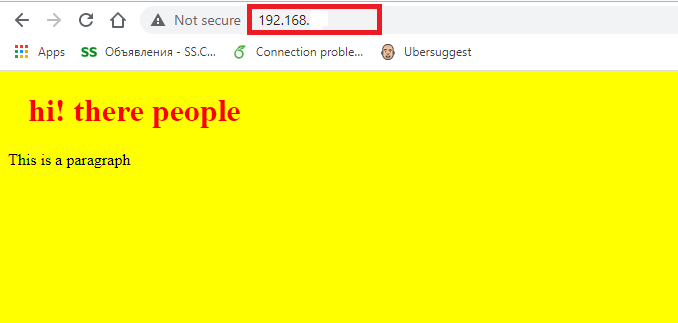
client.print("<body> <h1>hi! there people</h1>");
client.print("<p>This is a paragraph</p>");
client.print("</body></html>");
// The HTTP response ends with another blank line
client.println();
// Break out of the while loop
//return ;
} else { // if you got a newline, then clear currentLine
currentLine = "";
}
} else if (c != '\r') { // if you got anything else but a carriage return character,
currentLine = currentLine+c; // add it to the end of the currentLine
}
}
}
// Clear the header variable
header = "";
// Close the connection
client.stop();
Serial.println("Client disconnected.");
Serial.println("");
}
}Instructions to use the above code
First, you need to copy and paste the above code in your Arduino ide then select the esp32 board and select the correct port number
Second, compile and upload the script, when you see, the script got uploaded then at that instant, open the serial monitor to note down your IP address in case, if you see a blank screen on the serial monitor then at that instant, press enable EN button from ESP32 board
Third, paste the noted IP address in your web browser to view the HTML and CSS code which we have written with the help of the client.print() function
The common error with wifi.h libary
suppose, in case if have written the below script by using client.print() function then at that instant, you might have seen an error like below
unable to find string literal operator ‘operator””color’ with ‘const char [11]’, ‘unsigned int’ arguments
<!DOCTYPE html>
<html>
<head>
</head>
<body>
<h1 style="color:blue;text-align:center;">This is a heading</h1>
<p style="color:red;">This is a paragraph.</p>
</body>
</html>
we can remove the above error by double quoting the string such as below
client.print("<h1 style=""color:blue;text-align:center;"">GUI to ON and OFF a LED </h1>");client.println()
Description
in contrast, client.Println() function get to the newline on the server site through which the client is connected
Request and reply format of a client-server model
As you can see, from the above figure that, the request and replay message format of a client-server model contain four lines the first line is called a Request line so, to move from the first line to the second line and so on, we need a client.println() function
 // HTTP headers always start with a response code (e.g. HTTP/1.1 200 OK)
            // and a content-type so the client knows what's coming, then a blank line:
            client.print("HTTP/1.1 200 OK");
            client.println("Content-type:text/html");
            client.println("Connection: close");
            client.println();
Similarly, as you can see from the above code that we used client.print() to print the current line then to move on to the next line we used client.println() function
Leave a Reply