

Why should you use eclipse ide instead of Arduino ide
Arduino ide is good for beginners and it is not good for professional programming
Why?
At the time of writing, this blog Arduino ide have limited capabilities, and creating libraries with Arduino ide is nearly impossible
When the lines of code become more complex it will be very difficult to manage in Arduino ide
Arduino ide did not have any support for
- Refactoring
- Call trees
- Version control
- Syntax highlighter
- Code completion
- debugging
whereas, if you consider eclipse ide you will find a ton of features that are helpful for embedded software development
Install open JDK
Eclipse is purely java based ide so, you need JDK in your system to run eclipse
First, check whether you have java in your system
- Press keyword Win+r and type the command cmd to open a command prompt
In command prompt, type the below command to check whether you have JDK in your pc
java --versionIf you don’t have an open JDK version between version 10 and 16 then you can download from here —>
At the time of writing this blog the open JDK requirement is between version 10 and 16 so, check the proper required version before you installed the open JDK
After you finish downloading, then run the open JDK application
Note: the folder where you have saved the JDK application it is prohibited to have spaces and special characters in the pathname
How to know the port number of Arduino in windows OS
To view, the port number of Arduino in window OS, you need to have a USB driver installed on your pc and you can get a USB driver by installing Arduino ide
Click here to download Arduino ide —>
First, go to device manager in Window OS and find the port option to view the Arduino port number
Usually, the port number will be COM3 or COM4 and you can verify your port number by running a basic blink script on any Arduino board
The common methods, through which you can use Arduino in eclipse ide
First method
First, download the eclipse id and install it
Second, open the eclipse ide and go to help
Third, open eclipse marketplace and type Arduino in search bar to find Arduino ide
Fourth: install the Sloeber, the Arduino plugin for eclipse
If your installation is successful then you can proceed with Arduino ide in eclipse or else try the second method, but I find the third method is effective
Second method
First, open the eclipse ide and go to help
Second, open install new software and copy the code of stable version from here —–>

Third, paste the copied code into the available software search bar and press enter
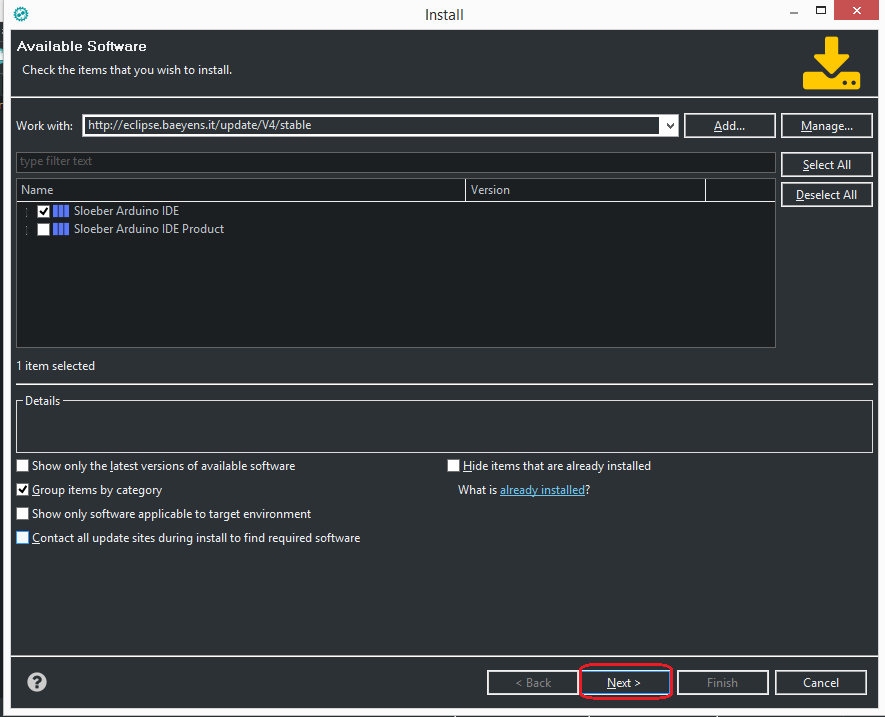
Fouth: click next, and if it asks to restart eclipse then click restart
Third method
First, download the software from eclipse.baeyens.it
You can download product bundle software from here —->
Second, unzipped the software by 7zip and it is recommended to use 7zip instead of WinRAR and run the Sloeber-id application
Third, make sure that you keep the folder near the root such as(C:\Sloeber) and keep the workspace such as (C:\ workspace)
How to write and compile an Arduino script
First, open the Sloeber-id from the Sloeber folder
Second, click Arduino—-> preferences—–>platforms and boards and type the Arduino board name which you are using for example (SAM Boards 32-bits ARM cortex –M3) is a board name for Arduino due
Third, click file—->new—-> Arduino sketch—-> type the project name and click next —->then select the board and port then click next—–> select default ino.file
In case, if you would like to test your configure then select option sample sketch —–>example—–> basics—->Blink——>finish

Fourth, on the left side of the ide, you will see a project explorer then click on your project to see Blink.ino file
Fifth, when the Blink.ino opens up write #include “Arduino.h” on top of your sketch
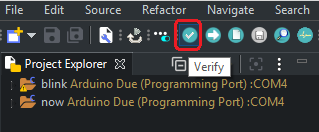
Sixth: finally build the program and run it, after, you finish with build and run then you will see the LED of Arduino will be blinking
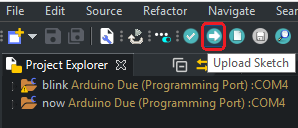
Similarly, instead of build and run you can also use verify and upload sketch
Leave a Reply